Devlog #5 | Developing a webpage as an excuse to learn Rust, Yew and WebAssembly
If you haven’t read the rest of the devlogs, you can find them here. You might be missing some context if you don’t.
Also, this is an old blogpost about something that wasn’t actually released as part of the project yet. Maybe one day I’ll finish it but the documentation value is important.
After another successful workshop,
Another Git workshop in the books, as the game server monitoring graphs can attest ✅ So fun when things work out well and people enjoy and learn.
— Shay Nehmad (@ShayNehmad) September 6, 2020
(But damn, I miss in-person workshops 😣) pic.twitter.com/mKYaEfwjqp
I decided it’s time to tackle issue #26 from the project’s backlog using rust, Yew, and WebAssembly. Here’s how it looks now that it’s done:
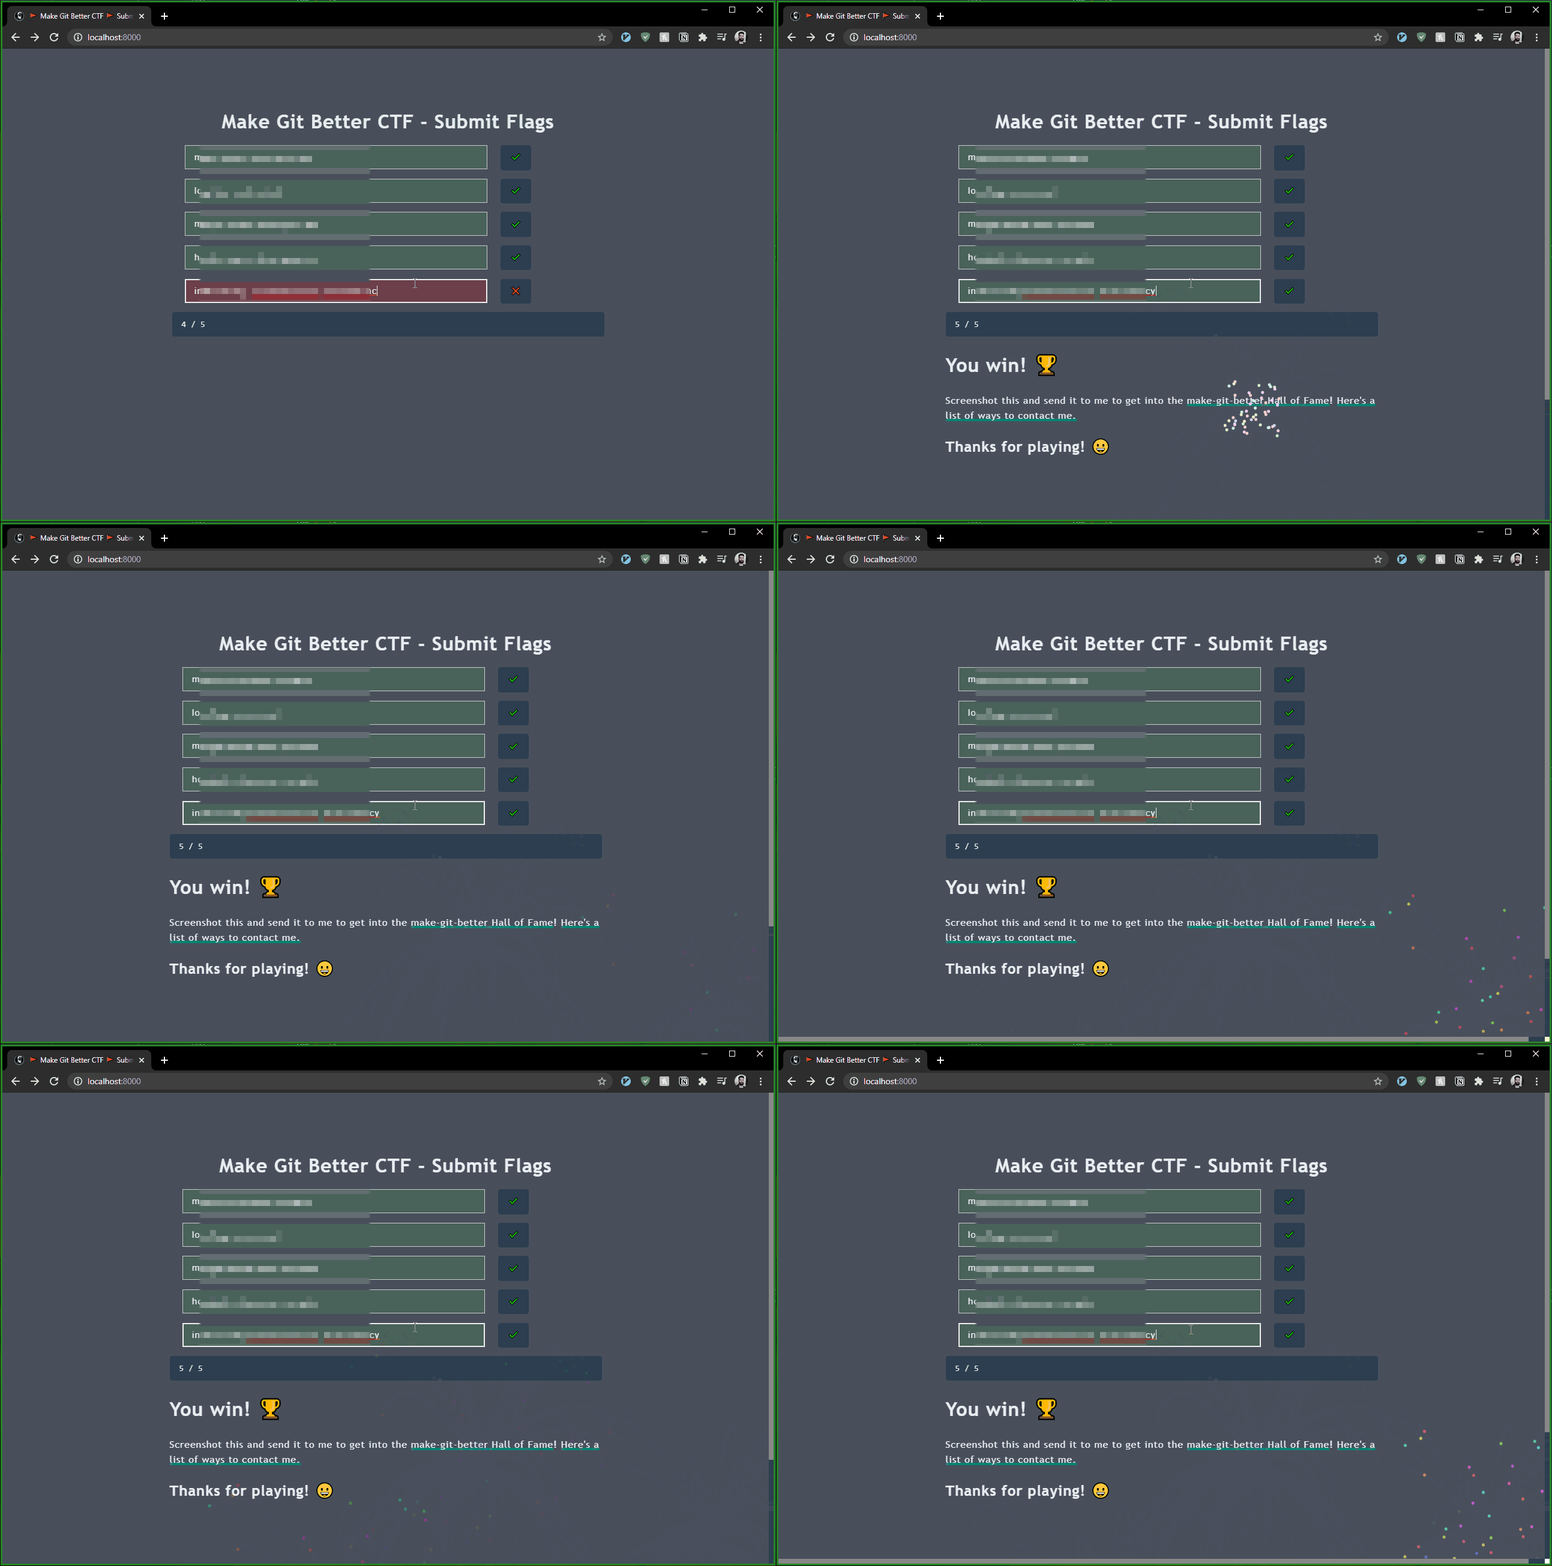
This posts in a live log of HOW I did this.
Some context, please
Issue #26 basically means that players can verify that they’ve finished the challenge done on their own. Players being able to check their own work is good for motivating them to finish the challenge. Also, it makes running the workshop even more hands-off, which is great, since it gives me more time to focus on attendees. Here’s the issue:
I’ve also decided this would be a good opportunity to practice more Rust and learn a little about WebAssembly using Yew. Since this is more of a learning exercise, expect this post to be a little more… verbose then usual.
The plan
Let’s start with some planning. We will need to:
- Create a script which parses all the final flags from the game’s configuration into a very simple JSON file. That file should only include the flags HASHED. Should look like this:
[{
    "name": "merge-5",
    "flag-sha256": "f0e4c2f76c58916ec258f246851bea091d14d4247a2fc3e18694461b1816e13b"
},
{
    "name": "remote-1",
    "flag-sha256": "699040c7908d5b03ad8dfca650ad30eff01b49571d21b193d4cb43ff05cd1b58"
}]
- Create a static webpage that reads this file and offers the user simple text boxes + a
✅ verifybutton.- When
✅ verifyis pressed, all correct/incorrect flags should be marked (with emojis/colored text boxes). - If all are correct, prints out a message which instructs the user to screenshot and send me the page to get into the Hall of Fame.
- When
- Write a super-simplistic web backend with
Rocketwhich basically only serves the one static file, or possibly just use rust’sminiserveor Python’shttp.server. - Extend the new
ansibleplaybook with commands which pull, build and serve the static page fromctf.mrnice.dev:1337.
To me, it makes sense to start with 2 -> 3 -> 4 and only then do 1. I can do 1 manually and only when I add new stages I’ll have to update it, so it’s the least important.
Let’s do this

Developing the webpage with Yew
Getting started with Yew
I started by following the getting started guide. I wanted to make sure the toolchain is up and running and I understood how it works (well, enough to work with it, anyway…).
To start, I created a new rust library and copied the template from the docs. Then I used wasm-pack to pack the rust library into a wasm.js file that a browser could use. wasm-pack requires OpenSSL and pkg-config; On my machine (Ubuntu 20.04 on WSL 2) this was solved by running the following commands:
sudo apt install libssl-dev
sudo apt install pkg-config
With yum, you need to install openssl-devel and pkgconfig, instead. Isn’t packaging fun? 😐
Then, running wasm-pack build --target web --out-name wasm --out-dir ./static and serving the output from the static folder using python3 -m http.server 8000 got me this, which was exciting:


And with some quick CSS and structure shoved into the static folder, it quickly looked OK, as well:

The develop -> build -> test loop
Even though I was done with the getting started guide, I still didn’t feel comfortable with Yew. I wanted to get into a good development loop to “get my sea legs” and just feel like I’m learning the new framework in a deep way. I want to REALLY understand this subject - enough to use it in a professional setting.

In order to do this, I broke down the development into small and manageable tasks. This was important since I’m working on this while working on a ton of other stuff as well, and low-level planning is useful for context switches.
- Create a basic
check flagcomponent with the level title + textbox + status emoji. Not the full logic for now. - Create a list of those components on the webpage based of a list of structs. The list of structs will be const for now.
- Add the hashing element and test.
- Change the const list from ‘1.’ to a list read from a JSON file.
- Add a
verify-allstate which checks all flags and prints a “you win” message, and instruction on how to send the message my way.
Creating a basic component in Yew
I’ve created a new file called level.rs and created a rather basic component in it. While WIP it looked like this:

But ended up looking somewhat sleeker (and with less clicks required!):

To understand what “Components” are, you can refer to the documentation and the source code. For now, let’s walk through my component’s code at this point to make sure we understand exactly what’s going on.
First (after the normal use calls), I defined the component’s state:
use log;

use yew::prelude::{Component, ComponentLink, Properties, html, Html, ShouldRender};
use yew::html::InputData;

pub struct LevelComponent {
    // The link enables us to interact (i.e. reqister callbacks and send messages) with the component itself. See https://yew.rs/docs/en/concepts/components/#create
    link: ComponentLink<Self>,
    // The level's name. This is so the user knows which flag belongs where
    name: String,
    // The flag itself. In the future this will become a hash so that the users can't get the flags using devtools.
    flag: String,
    // The user's guess for the flag, that they are typing
    user_flag: String,
    // Whether the correct flag has been entered.
    flag_correct: bool,
}
Next, I defined the messages of our component. These will be used in the component itself later on.
// These are the messages (think "events") that can happen in this component.
pub enum LevelMsg {
    // This message indicates that it's time to check the user flag to see if it's the correct one.
    CheckFlag,
    // This message indicates that the user changed the flg they're guessing (when they're typing).
    // Since we need to pass a value, this message has a parameter - see the `view` and `update` methods to see how this is used.
    UserFlagChanged(String),
}
Then it was time to define the properties:
// See https://yew.rs/docs/en/concepts/components/properties/
// The properties allow enable child and parent components to communicate with each other.
// The parent of a level component is the page itself.
#[derive(Clone, PartialEq, Properties)]
pub struct LevelProps {
    // This prop is the level's name. Passed from parent and won't change
    pub name: String,
    // This prop is the level's flag. Passed from parent and won't change
    pub flag: String,
    // This prop indicates whether the user's flag is correct. Not passed from parent, but rather used to communicate back to it from the level.
    #[prop_or(false)]
    pub flag_correct: bool,
}
Finally, we could declare our component! This is a pretty long chuck of code, but a lot of it is documentation, so just try to read it.
// See https://yew.rs/docs/en/concepts/components/
// `Component` is a Trait (see https://doc.rust-lang.org/book/ch10-02-traits.html),
// The source code of `Component` is here: https://github.com/yewstack/yew/blob/master/yew/src/html/mod.rs#L30
impl Component for LevelComponent {
    // Overriding properties since we have our own.
    type Properties = LevelProps;
    // Overriding `Message` since we have our own messages.
    type Message = LevelMsg;

    // See https://yew.rs/docs/en/concepts/components/#create
    fn create(props: Self::Properties, link: ComponentLink<Self>) -> Self {
        log::debug!("Creating level {} component", props.name.clone());
        Self {
            link: link,
            // Pass the name from the parent component
            name: props.name,
            // Pass the flag from the parent component
            flag: props.flag,
            // The initial user flag is empty
            user_flag: "".to_string(),
            // This has a default value of `false`. Not passed from parent
            flag_correct: props.flag_correct,
        }
    }

    // See https://yew.rs/docs/en/concepts/components/#update
    fn update(&mut self, msg: Self::Message) -> ShouldRender {
        log::debug!("Updating level {} component", self.name.clone());
        // Do something different depending on the update message.
        match msg {
            LevelMsg::CheckFlag => {
                log::debug!("In level {}, checking flag", self.name.clone());
                // TODO - Change this to hash instead of flag
                self.flag_correct = self.user_flag == self.flag;
                true  // Re-render
            }
            LevelMsg::UserFlagChanged(new_user_flag) => {
                log::debug!("In level {}, User flag changed from {} to {}", self.name.clone(), self.user_flag.clone(), new_user_flag.clone());
                self.user_flag = new_user_flag;
                self.update(LevelMsg::CheckFlag);
                true  // Re-render
            }
        }
    }

    // See https://yew.rs/docs/en/concepts/components/#change
    // We're not using "change"
    fn change(&mut self, _props: Self::Properties) -> ShouldRender{
        log::debug!("Changing level {} component", self.name.clone());
        false
    }

    // See https://yew.rs/docs/en/concepts/components/#view
    // In this method we're declaring what the element looks like. This is very reminiscent of JSX and React.
    fn view(&self) -> Html {
        log::debug!("Viewing level {} component", self.name.clone());

        // TODO - move to "create"
        let label_text = self.name.clone() + "'s flag goes here 🚩";
        let input_id = self.name.clone() + "-id";

        // Creating the element as variables makes it clearer - similar to functional elements in react

        // This element just prints the component info to make it easier to develop. Will delete soon :)
        let debug_info_element = html! {
            <pre>
                {
                    format!("DEBUG: I am a level component! Name: {} | Flag: {} | Status: {}",
                        self.name.clone(),
                        self.flag.clone(),
                        self.flag_correct)
                }
                <br/>
            </pre>
        };

        // This element is the input for the flag.
        let input_element = html! {
            <div class="input-effect">
                <input
                    id={ input_id.clone() }
                    /* Change the background colour effect according to the status. If the flag is correct, the class will be "effect-8 effect-10-good",
                     * which paints the BG of the text box green (and stays). Otherwise, paint it in red (as long as it's in focus).
                     */
                    class={ format!("effect-8 effect-10-{}", if self.flag_correct { "good" } else { "bad" }) }
                    type="text"
                    placeholder={label_text.clone()}
                    // Whenever the user inputs something into the box, notify this LevelComponent that the user flag has changed.
                    oninput=self.link.callback(|e: InputData| LevelMsg::UserFlagChanged(e.value))  // <-- important line!
                />
                // Cosmetics
                <span class="focus-bg"></span><span class="focus-border"><i></i></span>
            </div>
        };

        // This element is for a11y - don't indicate status with color only, but with an emoji as well.
        let status_element = html! {
            <pre class="status"> { get_correct_emoji(self.flag_correct) }</pre>
        };

        // This is the complete HTML component we're returning from `view`.
        html! {
            <span>
                // TODO - delete this
                { debug_info_element }
                <div>
                    { input_element }
                    { status_element }
                </div>
            </span>
        }
    }
}
As you can see the level component has a TON of log messages. The log actually go out to Chrome’s console using the wasm-logger crate! Here’s how it looks like in the console:
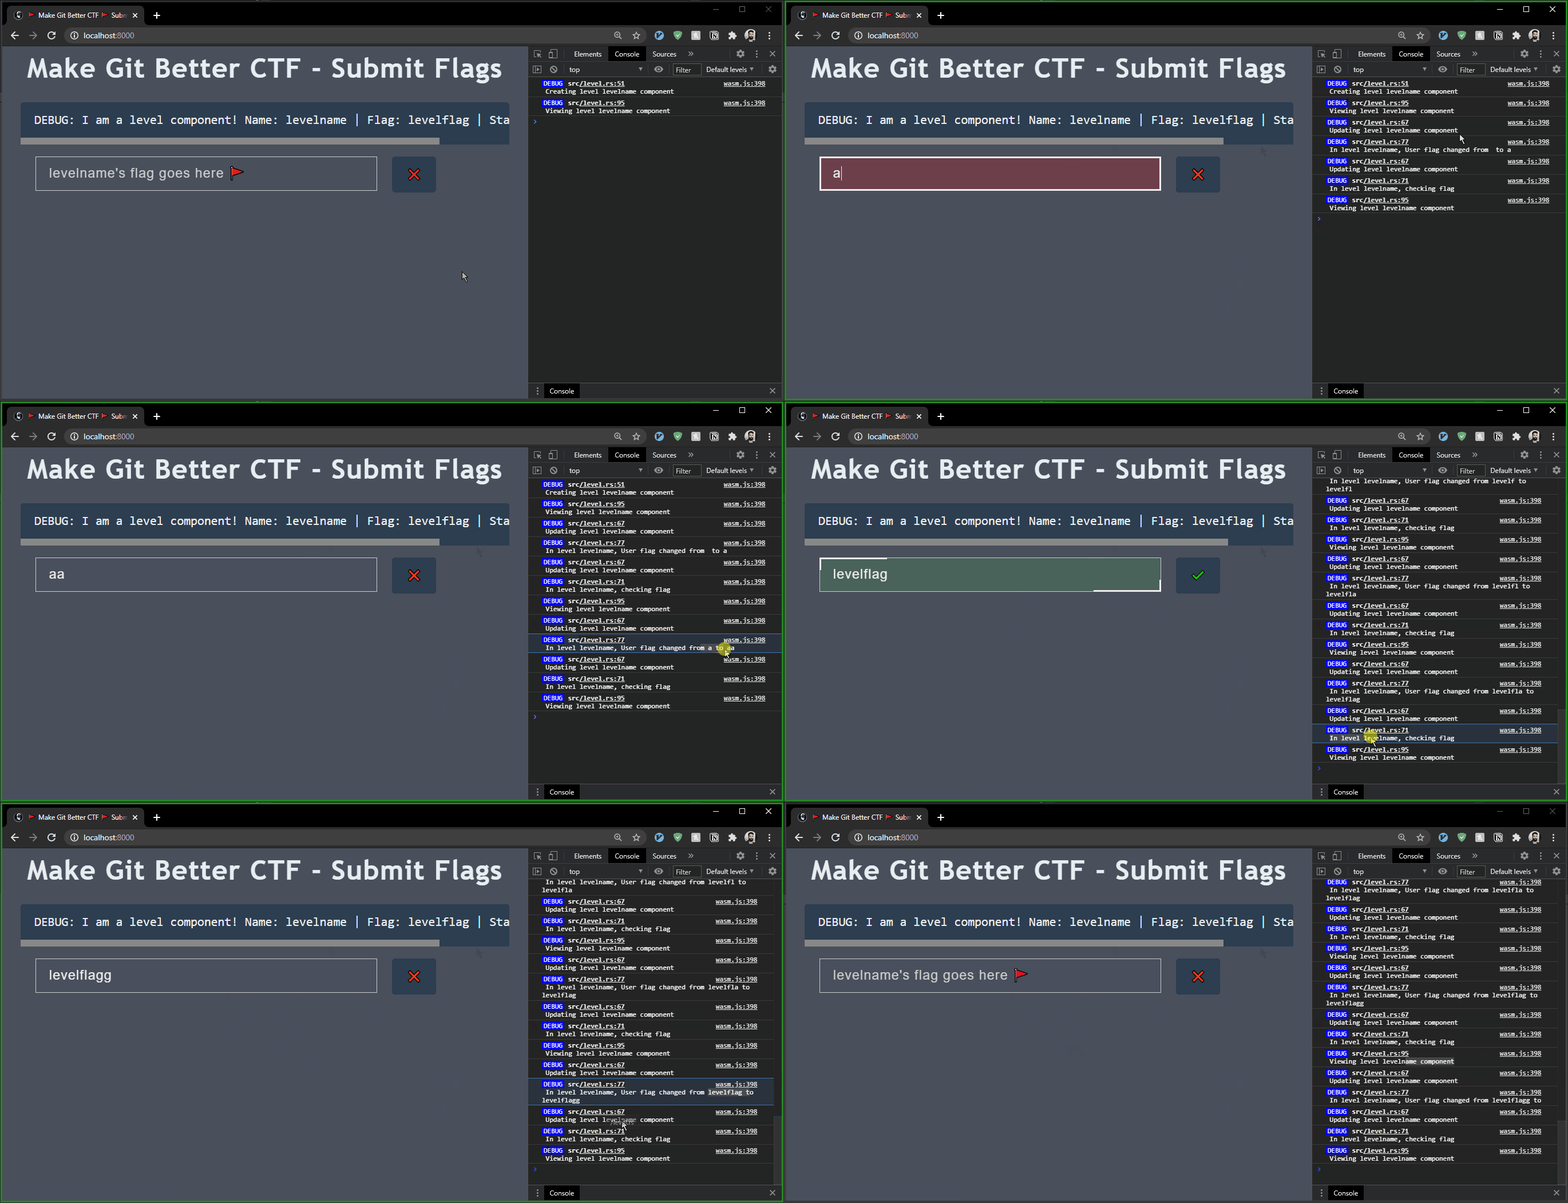
The log messages themselves:
wasm.js:398 DEBUG src/level.rs:51 Creating level levelname component
wasm.js:398 DEBUG src/level.rs:95 Viewing level levelname component
wasm.js:398 DEBUG src/level.rs:67 Updating level levelname component
wasm.js:398 DEBUG src/level.rs:77 In level levelname, User flag changed from  to a
wasm.js:398 DEBUG src/level.rs:67 Updating level levelname component
wasm.js:398 DEBUG src/level.rs:71 In level levelname, checking flag
wasm.js:398 DEBUG src/level.rs:95 Viewing level levelname component
wasm.js:398 DEBUG src/level.rs:67 Updating level levelname component
wasm.js:398 DEBUG src/level.rs:77 In level levelname, User flag changed from a to aa
wasm.js:398 DEBUG src/level.rs:67 Updating level levelname component
wasm.js:398 DEBUG src/level.rs:71 In level levelname, checking flag
wasm.js:398 DEBUG src/level.rs:95 Viewing level levelname component
To set this up I only needed to add this to the main file:
#[wasm_bindgen(start)]
pub fn run_app() {
    wasm_logger::init(wasm_logger::Config::default());
    App::<SubmitFlagsPage>::new().mount_to_body();
}
And finally we have a level component we’re happy with! Let’s move on 😀
Creating multiple levels from a vector
This was pretty straight-forward. Here’s the result:
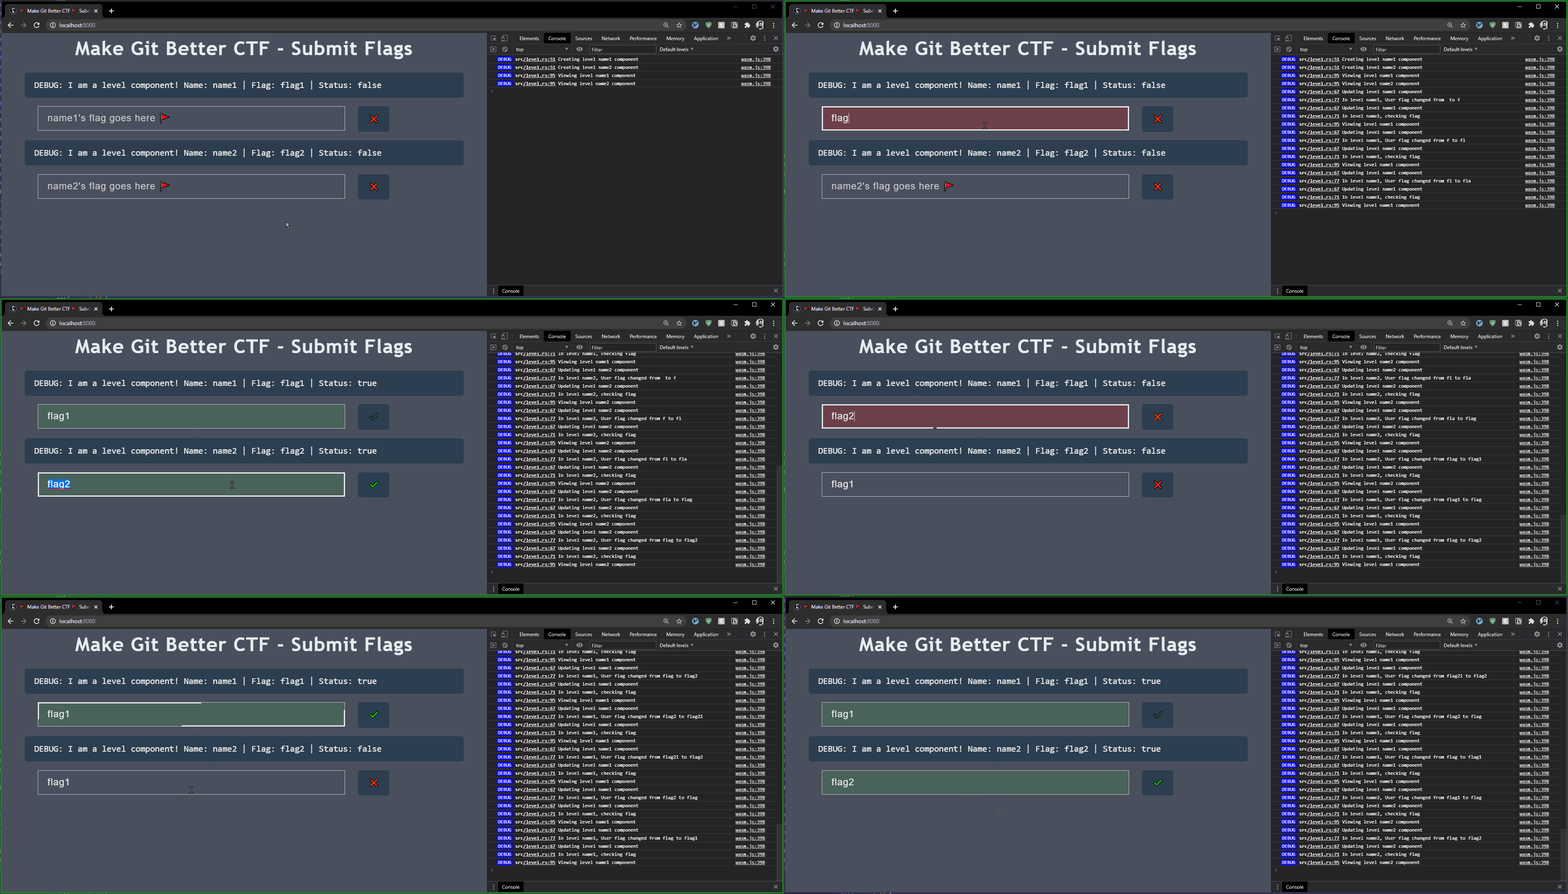
First, I defined the level information data structure, which is the “data” counterpart of the LevelComponent:
struct LevelInfo {
    name: String,
    flag: String,
}
Then, I change the view function of the main page to include this line, and added the create_component_from_level_info function for the iter().map() call:
// in SubmitFlagsPage::view()...
    <div id="level-checkers" class="content">
        { for self.levels.iter().map(create_component_from_level_info) }
    </div>

fn create_component_from_level_info(level_info: &LevelInfo) -> Html {
    html! {
        <LevelComponent name=level_info.name.clone() flag=level_info.flag.clone() />
    }
}
Finally, I initialized the “levels” vector with the following const values in create:
fn create(_: Self::Properties, link: ComponentLink<Self>) -> Self {
    // TODO change to read from file
    let const_level_1 = LevelInfo {name: "name1".to_string(), flag: "flag1".to_string()};
    let const_level_2 = LevelInfo {name: "name2".to_string(), flag: "flag2".to_string()};

    let levels_info_vector = vec![const_level_1, const_level_2];

    Self {
        link: link,
        levels: levels_info_vector,
        all_flags_done: false,
    }
}
Making the flags hashed instead of plaintext
First of all, why is this needed? Well, this is an “anti-cheating” mechanism. At our current state, the flags can be found by inspecting the page’s code. Let’s try to find the level name2’s flag as a cheater.
- In the “sources” tab of the webpage, open the compiled WebAssembly file
- Search for a level’s name (which we can see on the webpage itself)
- Look at the data: here’s the flag next to each level! 💸
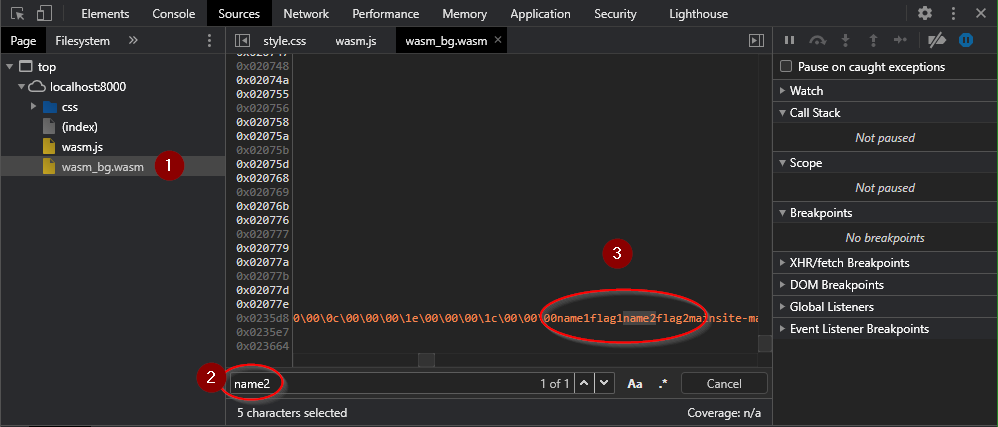
Let’s quickly hash “flag1” and “flag2” and change the const strings to hashes:


We need to change the implementation of the LevelComponent from a direct comparison to hashing. Here’s how that looks now:
use std::str;
use sha2::{Sha256, Digest};

// ...

impl Component for LevelComponent {
// ...

    // See https://yew.rs/docs/en/concepts/components/#update
    fn update(&mut self, msg: Self::Message) -> ShouldRender {
        // Do something different depending on the update message.
        match msg {
            LevelMsg::CheckFlag => {
                // Hash the user flag to an array
                let hashed_user_flag_arr = Sha256::digest(self.user_flag.as_bytes());
                // Cast the array to a string
                let hashed_user_flag_str: String = format!("{:x}", hashed_user_flag_arr);
                log::debug!("update::{}, user flag {}, user hash {}, actual flag hash {}",
                    self.name.clone(),
                    self.user_flag.clone(),
                    hashed_user_flag_str.clone(),
                    self.flag.clone());
                // Compare user hash to our hash
                self.is_flag_correct = hashed_user_flag_str == self.flag;
                true  // Re-render
            }
            LevelMsg::UserFlagChanged(new_user_flag) => {
                log::debug!("update::{}, User flag changed from {} to {}", self.name.clone(), self.user_flag.clone(), new_user_flag.clone());
                self.user_flag = new_user_flag;
                self.update(LevelMsg::CheckFlag);
                true  // Re-render
            }
        }
    }
// ...
}
Here’s how it looks like:
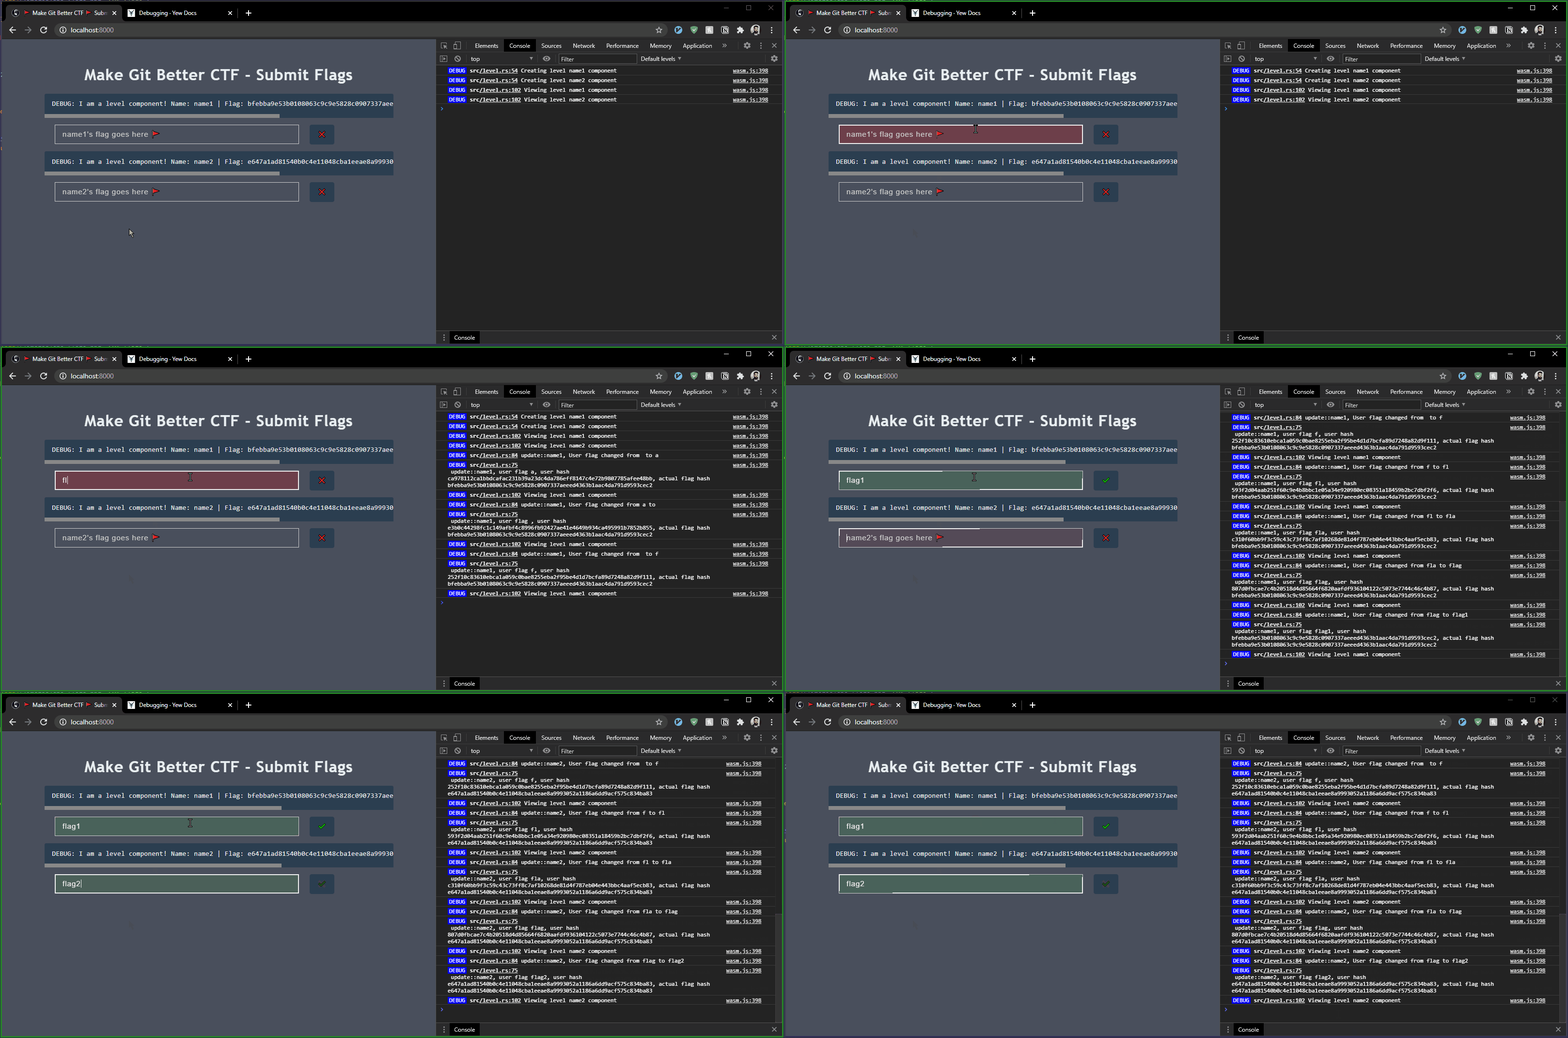
Here is some log output:
wasm.js:398 DEBUG src/level.rs:54 Creating level name1 component
wasm.js:398 DEBUG src/level.rs:54 Creating level name2 component
wasm.js:398 DEBUG src/level.rs:102 Viewing level name1 component
wasm.js:398 DEBUG src/level.rs:102 Viewing level name2 component
wasm.js:398 DEBUG src/level.rs:84 update::name1, User flag changed from  to a
wasm.js:398 DEBUG src/level.rs:75 update::name1, user flag a, user hash ca978112ca1bbdcafac231b39a23dc4da786eff8147c4e72b9807785afee48bb, actual flag hash bfebba9e53b0108063c9c9e5828c0907337aeeed4363b1aac4da791d9593cec2
wasm.js:398 DEBUG src/level.rs:102 Viewing level name1 component
wasm.js:398 DEBUG src/level.rs:84 update::name1, User flag changed from a to
wasm.js:398 DEBUG src/level.rs:75 update::name1, user flag , user hash e3b0c44298fc1c149afbf4c8996fb92427ae41e4649b934ca495991b7852b855, actual flag hash bfebba9e53b0108063c9c9e5828c0907337aeeed4363b1aac4da791d9593cec2
wasm.js:398 DEBUG src/level.rs:102 Viewing level name1 component
wasm.js:398 DEBUG src/level.rs:84 update::name1, User flag changed from  to f
wasm.js:398 DEBUG src/level.rs:75 update::name1, user flag f, user hash 252f10c83610ebca1a059c0bae8255eba2f95be4d1d7bcfa89d7248a82d9f111, actual flag hash bfebba9e53b0108063c9c9e5828c0907337aeeed4363b1aac4da791d9593cec2
wasm.js:398 DEBUG src/level.rs:102 Viewing level name1 component
wasm.js:398 DEBUG src/level.rs:84 update::name1, User flag changed from f to fl
wasm.js:398 DEBUG src/level.rs:75 update::name1, user flag fl, user hash 593f2d04aab251f60c9e4b8bbc1e05a34e920980ec08351a18459b2bc7dbf2f6, actual flag hash bfebba9e53b0108063c9c9e5828c0907337aeeed4363b1aac4da791d9593cec2
wasm.js:398 DEBUG src/level.rs:102 Viewing level name1 component
And most importantly - the flag is no longer in the source, so you can’t cheat by reading the source of the webpage itself!

While working on this I ran into a weird panic, so I added the console_error_panic_hook crate to understand the stacktrace better - here are some details about that.
Order, please

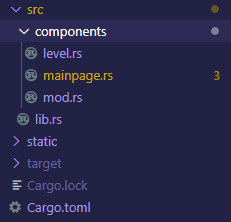
At this point, it felt right to clean up the lib.rs file which felt like it was going out of control (and looking at the remaining tasks, it was only going to get worse). So I decided to move the components into a “components” module. See Managing Growing Projects with Packages, Crates, and Modules from the rustbook for details. Ended up with this, which looks better:
Read the level information from a JSON file
The level information JSON file can’t be read from the filesystem, since we’re running inside the browser. So we need to serve the JSON file and fetch it from the web app. After a couple of tries, I’ve found this YEW tutorial by Davide Del Papa. It’s a little out dated (I opened an issue, of course) but really well-structured!
Now that we have a fetch, that means that we now have a few states. Let’s describe them:
- We start uninitialized. We don’t have the data, and we haven’t requested it yet. The user should see a loading animation and we should go get the data.
- We move to “fetching”. This is us waiting for the data to return from the server. The user should still see a loading animation.
- We end up in two possible situations:
- Data was fetched and parsed correctly. Move the the “normal” state which we’ve built so far.
- An error somewhere. We ought display the error to the user with instructions how to fix it (which are: reach out to me).
This state should be in our “MainPage” component, which is in change of fetching the data and creating the level components from it. The fetching should be someplace else, so I’ve created a “GetFlagsService”. To fetch the data, I’ve used Yew’s FetchService. To parse it I’ve used serde_json for Parsing the JSON as a strongly typed data structure.
Here’s the GetFlagsService, which is charge of fetching and parsing. It uses a callback that emits the value (or error) to:
pub struct GetFlagsService {
    file_path: &'static str,
}

impl GetFlagsService {
    pub fn new(file_path: &'static str) -> Self {
        Self {
            file_path,
        }
    }

    pub fn get_response(&mut self, callback: Callback<Result<LevelsInfo, Error>>) -> FetchTask {
        let handler = move |response: Response<Result<String, Error>>| {
            let (head, body) = response.into_parts();
            if head.status.is_success() {
                log::debug!("Response is a success");
                let body_value = body.unwrap();
                log::debug!("here's the body: {}", body_value);
                let parsed = try_to_parse_levels_json(&body_value);
                match parsed {
                    Ok(v) => {
                        log::debug!("JSON conversion went well! Found {} levels", v.levels.len());
                        callback.emit(Ok(v))
                    }
                    Err(e) => {
                       callback.emit(Err(anyhow!("{:?}", e)));
                    }
                }
            } else {
                callback.emit(Err(anyhow!(
                    "{}: error getting levels from server",
                    head.status
                )))
            }
        };

        // Local server
        let url = format!("/{}", self.file_path);

        let request = Request::get(url.clone().as_str()).header("Cache-Control", "no-cache").body(Nothing).unwrap();
        log::debug!("Created get request to URI {}", request.uri());
        FetchService::fetch(request, handler.into()).unwrap()
    }
}

fn try_to_parse_levels_json(data: &str) -> Result<LevelsInfo, serde_json::Error> {
    let parsed: LevelsInfo = serde_json::from_str(data)?;
    Ok(parsed)
}
To use GetFlagsService in the MainPage component, we had to make some changes. First, add all relevant members to the component’s struct:
pub struct MainPage {
    link: ComponentLink<Self>,
    levels: Option<Vec<LevelInfo>>,
    all_flags_done: bool,
    error: String,

    // Fetch-related members
    flags_service: GetFlagsService,
    flags_service_response: Option<LevelsInfo>,
    flags_service_callback: Callback<Result<LevelsInfo, Error>>,
    flags_service_task: Option<FetchTask>,
    requested_flags: bool,
}
Then, add the new messages which help us transfer from state to state. The important one here is FlagsResponseReady, which receives a Result<LevelsInfo, Error> as an argument. This means that when we get the response in the GetFlagsService, we’re going to emit the response as a Result which might be an error and might be OK. We’ll see how we consume that Result later.
#[derive(Debug)]
pub enum MainPageMsg {
    // Fetch-related messages
    GetFlagsResponse,
    FlagsResponseReady(Result<LevelsInfo, Error>),
}
Initialize these in create. Note the new FlagsService, and how we’re linking the callback!
impl Component for MainPage {
    type Message = MainPageMsg;
    type Properties = ();
    fn create(_: Self::Properties, link: ComponentLink<Self>) -> Self {
        Self {
            link: link.clone(),
            levels: None,
            all_flags_done: false,
            error: "".to_string(),

            flags_service: GetFlagsService::new("levels_info.json"),
            flags_service_response: None,
            flags_service_callback: link.callback(MainPageMsg::FlagsResponseReady),
            flags_service_task: None,
            requested_flags: false
        }
    }
// ...
}
In update, we’re dealing with all the new messages. You can see that we’re matching on the FlagsResponseReady message twice! Once when it’s Ok and once when it’s an Err.
fn update(&mut self, msg: Self::Message) -> ShouldRender {
  log::debug!("MainPage: Update message {:?}", msg);
  match msg {
      MainPageMsg::GetFlagsResponse => {
          log::debug!("Sending a get response");
          let task = self.flags_service.get_response(self.flags_service_callback.clone());
          log::debug!("Sent a get response");
          self.flags_service_task = Some(task);
          self.requested_flags = true;
      }
      MainPageMsg::FlagsResponseReady(Ok(response)) => {
          self.flags_service_response = Some(response);
          log::debug!("Got response: {:?}", Json(self.flags_service_response.clone()));
          // Finally, get the levels from the response. Phew!
          self.levels = Some(self.flags_service_response.as_mut().unwrap().levels.clone());
      }
      MainPageMsg::FlagsResponseReady(Err(err)) => {
          log::error!("Error while trying to fetch flags: {:?}", err);
          self.error = format!("{:?}", err);
      }
  }
  true
}
And finally, we need to make view deal with all this stuff. We move from “uninitialized” to “fetching” using the self.requested_flags member:
    fn view(&self) -> Html {
        // If you didn't request flags yet, try to.
        if !self.requested_flags {
            log::debug!("Requesting flags for the first time.");
            self.link.send_message(MainPageMsg::GetFlagsResponse);
        }

        html! {
            <>
                <main class="site-main section-inner thin animated fadeIn">
                    <h1 id="home-title">{ "Make Git Better CTF - Submit Flags" }</h1>
                    { self.get_levels_comp() }
                </main>
            </>
        }
    }
And the component itself is in get_levels_comp, and you can see the different states being managed with Option and self.error:
// Extra, non-component functions for MainPage
impl MainPage {
    fn get_levels_comp(&self) -> Html {
        match &self.levels {
            None => {
                // Check if still laoding, or an actual error
                if self.error.is_empty() {  // Still loading
                    html! {
                        <>
                            <div class="spinner"></div>
                            <p>{ "No levels yet. Loading from server. If this is taking more than a few seconds, check the console logs." }</p>
                        </>
                    }
                } else {  // Error state
                    html! {
                        <>
                            <div class="spinner"></div>
                            <p>{ format!("An error has occured! Details:") }</p>
                            <pre> { self.error.clone() } </pre>
                            <p>{ "Please reach out to Shay Nehmad (@ShayNehmad on Twitter) with the details!" }</p>
                        </>
                    }
                }
            }
            Some(levels) => {
                html! {
                    <div id="level-checkers" class="content">
                        {
                            for levels.iter().map(create_component_from_level_info)
                        }
                    </div>
                }
            }
        }
    }
}
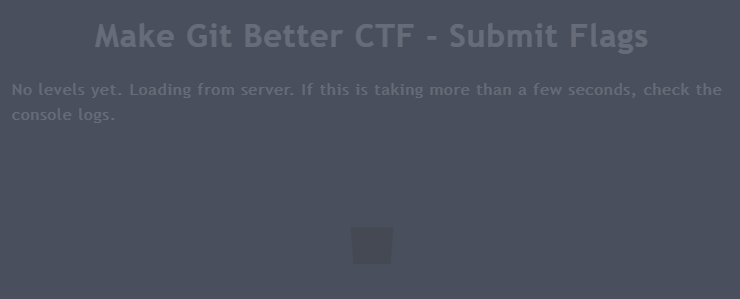
Now, to test! First, let’s start with a sanity test: the file is correct. It works! 🎉 While waiting for the file it shows:
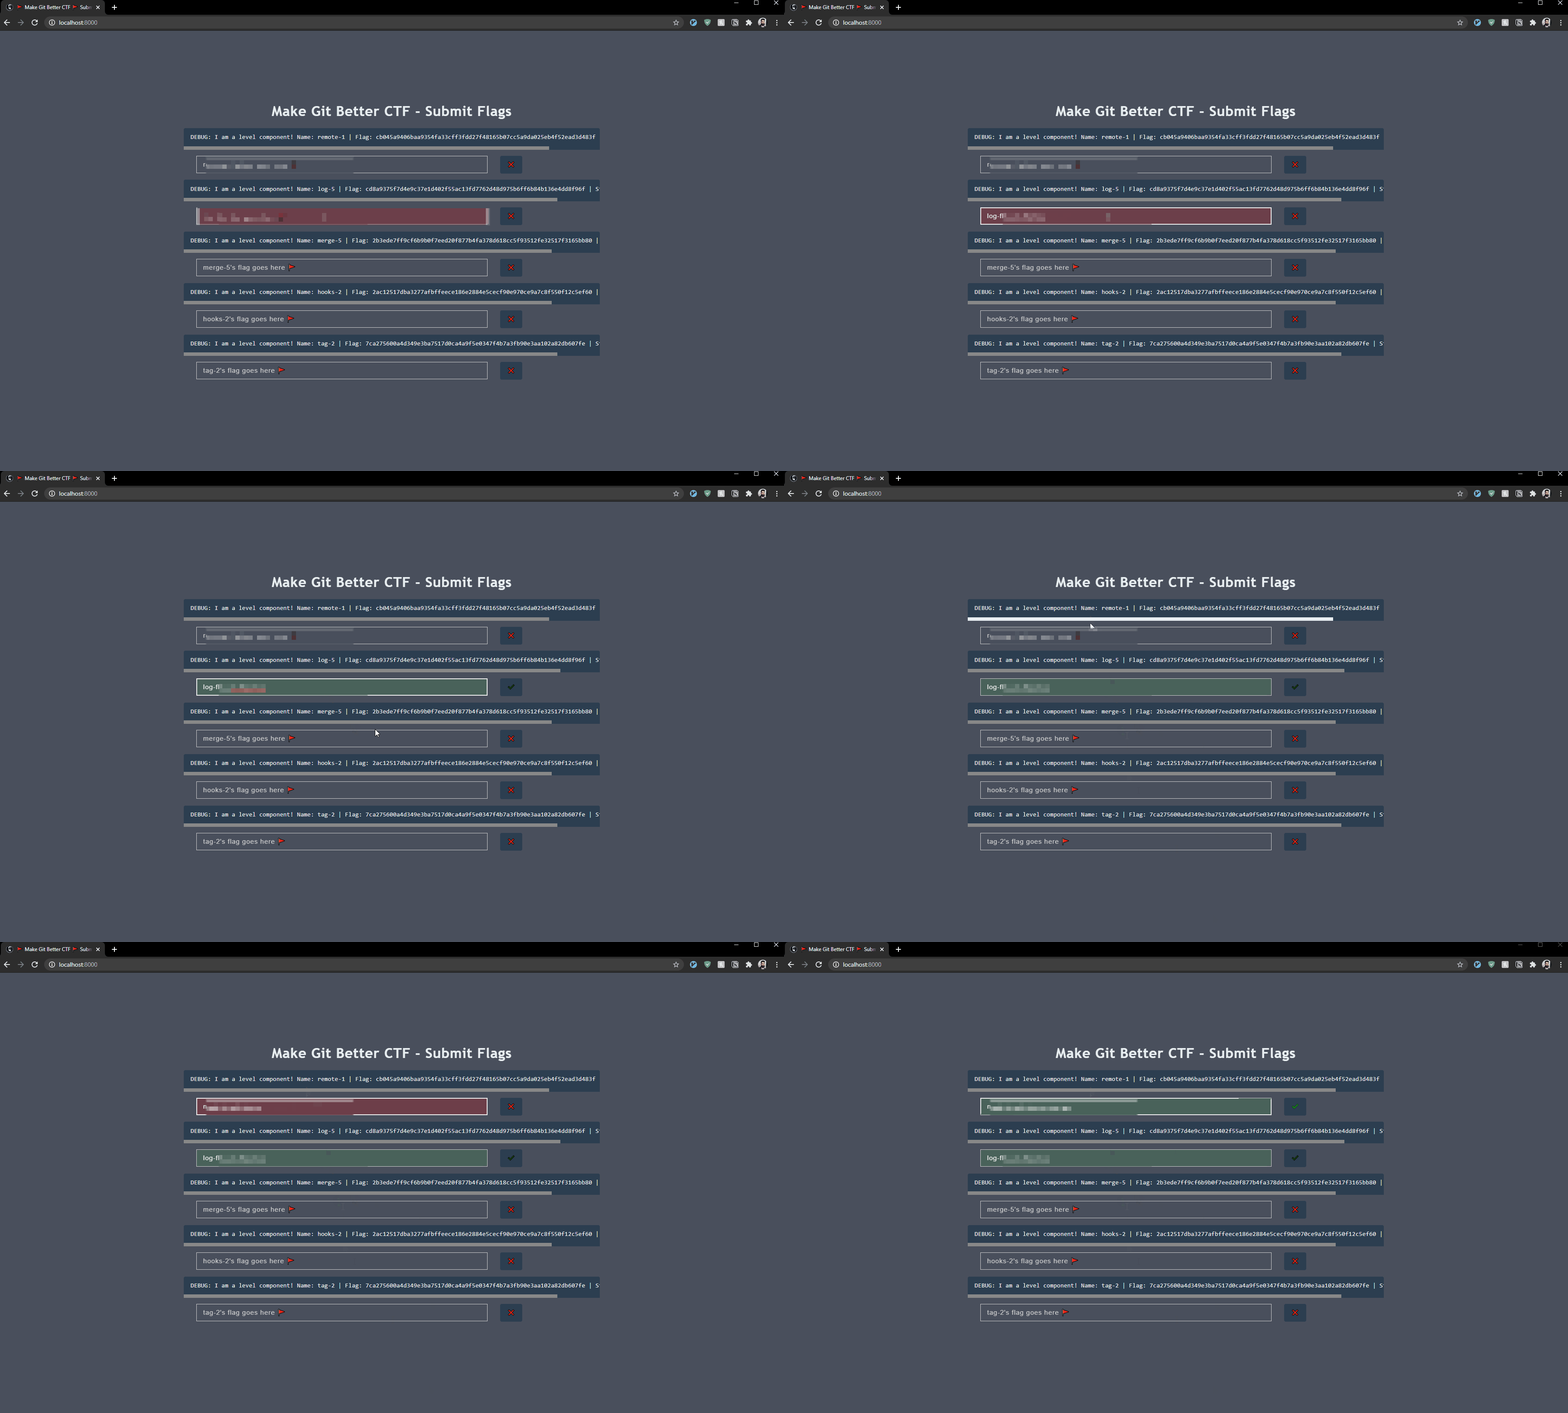
And then the site boots up and you can put in the flags. This GIF is censored of course :)
Let’s introduce a Typo into the JSON file and see how that looks:

Add a “check all” win state
In this final stage of development, I needed need to add state to the main page which checks how many levels were completed and displays a win message accordingly. There are a few possible solutions to do this, but I’ve opted to go with adding a levels_status map to the main page and having each level component update it via a callback function.
First, I moved all necessary information into the common.rs file: The status struct, the main page messages, and the callback type.
#[derive(Debug)]
pub struct SingleFlagStatus {
    pub level_name: String,
    pub is_correct: bool
}

#[derive(Debug)]
pub enum MainPageMsg {
    CheckSingleFlag(SingleFlagStatus),
    // Fetch-related messages
    GetFlagsResponse,
    FlagsResponseReady(Result<LevelsInfo, Error>),
}

pub type CheckFlagCallback = Callback<SingleFlagStatus>;
Adding the callback to the level component wasn’t too hard. Using a pub type for it instead of writing out the generic type each time was very useful, since it saved me from errors I had with mismatched generic types. The interesting part is in update, where the component emits its status via the callback:
use super::common::{SingleFlagStatus, CheckFlagCallback};


pub struct LevelComponent {
    // ... snip ...
    // Callback to update parent that flag has been solved
    check_callback: CheckFlagCallback,
}

// ... snip ...
pub struct LevelProps {
    // ... snip ...
    // Callback to update parent that flag has been solved
    pub check_callback: CheckFlagCallback,
}

impl Component for LevelComponent {
    type Properties = LevelProps;
    type Message = LevelMsg;

    fn create(props: Self::Properties, link: ComponentLink<Self>) -> Self {
        Self {
            // ... snip ...
            check_callback: props.check_callback,
        }
    }

    fn update(&mut self, msg: Self::Message) -> ShouldRender {
        match msg {
            LevelMsg::CheckFlag => {
                // ... snip ...
                // update parent via callback
                let status = SingleFlagStatus { level_name: self.name.clone(), is_correct: self.is_flag_correct };
                self.check_callback.emit(status);

                true  // Re-render
            }
            // ... snip ...
        }
    }
The main page component now needed to create the state and manage it. The state itself is managed in the levels-status map, which is created in the create function and initialized once we get the flags from the server:
use super::common::{LevelInfo, LevelsInfo, MainPageMsg, CheckFlagCallback};

pub struct MainPage {
    // ... snip ...
    // The status of each level component (name to is_correct)
    levels_status: HashMap<String, bool>,

    // ... snip ...
}

impl Component for MainPage {
    type Message = MainPageMsg;

    fn create(_: Self::Properties, link: ComponentLink<Self>) -> Self {
        Self {
            // ... snip ...
            levels_status: HashMap::new(),
            // ... snip ...
        }
    }

    fn update(&mut self, msg: Self::Message) -> ShouldRender {
        match msg {
            // ... snip ...
            MainPageMsg::FlagsResponseReady(Ok(response)) => {
                self.flags_service_response = Some(response);
                // ... snip ...
                for level in self.levels.as_ref().unwrap().iter() {
                    self.levels_status.insert(level.name.clone(), false);
                }
            }
            // ... snip ...
        }
        true
    }
The main page creates and registers the callback in the view call, when creating the LevelComponents. I had to use rust closures here since we wanted to keep access to self when creating the LevelComponents (to access self.link.component) but still use an iterator to create the levels since that’s how Yew handles lists of components. As you can see, when creating the component, the main page is passing the callback as a prop.
impl MainPage {
    fn get_levels_comp(&self) -> Html {
        match &self.levels {
            None => {
                // ... snip ...
            }
            Some(levels) => {
                let render_level_component = |level| {
                    self.create_component_from_level_info(level)
                };

                html! {
                    <div id="level-checkers" class="content">
                        {
                            for levels.iter().map(render_level_component)
                        }
                    </div>
                }
            }
        }
    }

    fn create_component_from_level_info(&self, level_info: &LevelInfo) -> Html {
        let callback: CheckFlagCallback = self.link.clone().callback(MainPageMsg::CheckSingleFlag);
        html! {
            <LevelComponent name=level_info.name.clone() flag=level_info.flag.clone() check_callback=callback />
        }
    }
}
In the update function, the main page handles the callback by accessing the relevant value in the map using the get_mut accessor and changing its value based on the reported status:
impl Component for MainPage {
    // ... snip ...
    fn update(&mut self, msg: Self::Message) -> ShouldRender {
        match msg {
            // ... snip ...
            // Callback for level component
            MainPageMsg::CheckSingleFlag(status) => {
                *self.levels_status.get_mut(&status.level_name).unwrap() = status.is_correct;
            }
        }
        true
    }
Finally, I’ve added the visual indication of the win state with a “totals” functional component. First I added it in the main page view:
    fn view(&self) -> Html {
        // ... snip ...
        html! {
            // ... snip ...
                { self.get_totals_comp() }
            // ... snip ...
        }
    }
Let’s walk through the totals code.
If the levels counter is not initialized yet (since we’re waiting on the fetch to return or we’ve had an error), it’s just an empty component.
impl MainPage {
    fn get_totals_comp(&self) -> Html {
        if self.levels_status.is_empty() {
            html! {}
Otherwise, we want to count how many flags are correct:
        } else {
            let mut len = 0;
            let mut counter = 0;
            for (_, is_correct) in self.levels_status.iter() {
                len += 1;
                if *is_correct {
                    counter += 1;
                }
            };
And then show the victory component if all are correct:
            let victory_comp: Html;

            if len == counter {
                victory_comp = html! {
                    <>
                        // fireworks!
                        <div class="pyro"><div class="before"></div><div class="after"></div></div>
                        <div class="content">
                            <h1>{ "You win! 🏆" }</h1>
                            <p>
                                { "Screenshot this and send it to me to get into the " }
                                <a target="_blank" rel="noopener noreferrer" href="https://www.mrnice.dev/about/#nc-shay-nehmad-443">{"make-git-better Hall of Fame"}</a>{"! "}
                                <a target="_blank" rel="noopener noreferrer" href="https://www.mrnice.dev/about/#nc-shay-nehmad-443">{"Here's a list of ways to contact me."}</a>
                            </p>
                            <h2>{ "Thanks for playing! 😀" }</h2>
                        </div>
                    </>
                };
            } else { victory_comp = html! { }; }

            html! {
                <div id="totals">
                    <pre>{ format!("{} / {}", counter, len) }</pre>
                    { victory_comp }
                </div>
            }
        }
    }
// ... snip ...
Here’s how it ended up looking:

The webserver
Since this is a very simple static app, all we need is to server the HTML, CSS, levels_info.json and compiled WASM from a static folder, and make sure we serve index.html as the index. We can use simple-http-server which really can’t be simpler. Installation and execution are basically two commands, cargo install simple-http-server and running with simple-http-server --index --nocache --port 1337:

BTW, we can also use miniserve by downloading it from GitHub with wget https://github.com/svenstaro/miniserve/releases/download/v0.9.0/miniserve-v0.9.0-linux-x86_64, then chmod +x-ing it and finally running miniserve --index index.html . inside the static folder - but installation is annoying since you need the nightly build of rust, so we’ll go with simple-http-server.
What now?
I decided to not deploy this for now. Maybe in the future. The branch is still open here, so this might actually happen someday!
