We Built a Slack Bot for Valet Parking Services: 🅿️art 1 | The Start
A joint project with my beautiful wife Olga! <3
In this post, we’ll go over how we built a Slack Bot that helped my company manage parking spots.
Table of Contents
Requirements

Why do this, the stupid reason
Recently my company expanded and we now have 7 parking spots at the office, instead of the 2 we USED to have. While we have a 100% flex policy on working from home, the office is really fun - people want to come in. And with more people coming in, more parking needs to be managed.
With two spots, it’s been pretty easy to manage manually. We opened a
Slack Channel called #parking, set up ground rules for reserving the spots,
and responded to queries about spots manually:
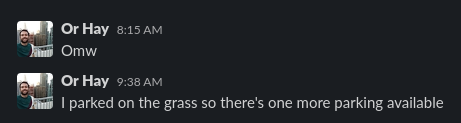
Reserving a spot for the day
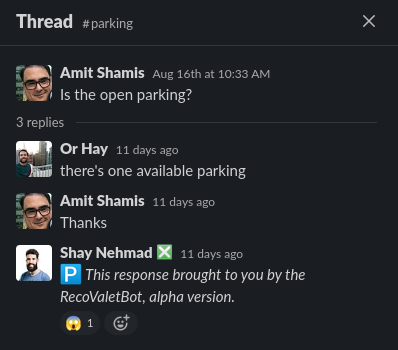
Asking what's the current status of parking spots

Announcing that the parking is full for the day
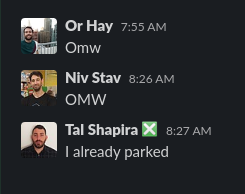
When things go wrong... Parking without reserving
If there are no open spots available, we have an option to park at a nearby garage. Parking in the garage has three drawbacks:
- 🚶♀ It’s not in the office, which means we have to walk from and to the garage.
- 💰 It costs the company more money since the company pays the garage fees.
- 👷 We don’t want employees to mess with their phones while driving. We’d prefer for them to know where they are going to park at before getting on the road.
Due to these drawbacks, we’d prefer employees to park at the office whenever possible.
This manual system worked OK-ish with 2 spots. With 7?! No way. Time to automate!

Why do this, the real reason
Olga starts a new job soon after 6 months on Maternity Leave. 🐣 This project is mostly about learning and practicing, so that Olga can start a new job as sharp as possible.
Planning
Task Management
Every good project starts with a board!

So Olga set up a project board on Notion. The experience of working with it has been surprisingly nice! But I guess when comparing to Jira, every possible system will feel better… Here’s a screenshot of the board in the middle of work:

Architecture
We also invested into drawing up the architecture for the project. This architecture went through some phases. First, we thought that we were going to use serverless functions for the REST API backend (we’re on GCP, so Cloud Functions), so the architecture looked like this:
DeploymentDiagram [frame=true framecolor=steelblue label="SlackValetBot Deployment Diagram"] {
 node slack as "Slack" {
   artifact channel as "#parking"
   artifact bot as "Slack App"
  }

 node cloud as "Google cloud" {
  artifact triggerEndpoint
  artifact cloudFunction [icon=file]
 }
 node calendar as "Google Calendar" {
  artifact parkingSpots as "Parking\nSpots" [icon=database]
 }

 channel -> bot "(1) /reserve"
 bot -> triggerEndpoint "(2) HTTP req"
 triggerEndpoint -> cloudFunction "(3) Trigger"
 cloudFunction -> parkingSpots "(4) API req"
 parkingSpots -> cloudFunction "(5) API resp"
 cloudFunction -> triggerEndpoint "(6) Function\nreturn value"
 triggerEndpoint -> bot "(7) HTTP resp"
 bot -> channel "(8) Available\nor N/A"
}

Architecture Phase 1 | Cloud Function
But after reading into what we should learn, we decided to move to Cloud Run, and set up the REST backend inside a Docker container, instead:
DeploymentDiagram [frame=true framecolor=steelblue label="SlackValetBot Deployment Diagram"] {
 node slack as "Slack" {
   artifact channel as "#parking"
   artifact bot as "Slack App"
  }

 node cloud as "Google cloud" {
  artifact triggerEndpoint
  artifact cloudRun
 }

node container as "REST API Backend Container" {
  artifact httpServer [icon=file]
}

 node calendar as "Google Calendar" {
  artifact parkingSpots as "Parking\nSpots" [icon=database]
 }

 channel -> bot "(1) /reserve"
 bot -> triggerEndpoint "(2) HTTP req"
 triggerEndpoint -> cloudRun "(3) Trigger"
 cloudRun -> httpServer "(4) Init conatainer"
 cloudRun -> httpServer "(5) HTTP req"
 httpServer -> parkingSpots "(6) API req"
 parkingSpots -> httpServer "(7) API resp"
 httpServer -> triggerEndpoint "(8) Function\nreturn value"
 triggerEndpoint -> bot "(9) HTTP resp"
 bot -> channel "(10) Available\nor N/A"
}

Architecture Phase 2 | Cloud Run
Working
Setting up a working environment
Since Olga’s PC is mostly used for gaming and not for development, it’s wasn’t really set up for work. It’s a Windows machine, but we set up WSL to make development easier (I’m on an Ubuntu machine and in general Windows isn’t super great for dev IMHO). Luckily, I’ve already written a post on the subject, so we just followed the guide there!
Setting up GCP
We tried setting up GCP on Olga’s account, but had issues - for some reason, we couldn’t activate her account. So we ended up using mine.
First, we created a new project:

We’ve also set up a budget alert to avoid surprises:

And finally, I added Olga as a co-owner.
We could spend more time on this setup, using IaC stuff - but this is good enough to start playing around with it.
Developing an initial server
Our setup is based on Poetry, so the project structure so far is:
❯ tree
.
├── Dockerfile
├── LICENSE
├── poetry.lock
├── pyproject.toml
├── README.md
└── src
    └── valet_parking_slack_bot
        ├── main.py
        ├── __pycache__
        │   └── server.cpython-39.pyc
        └── server.py

3 directories, 8 files
We started by developing a very simple Flask app:
from flask import Flask
from flask import request


app = Flask(__name__)


@app.route('/spots', methods=['GET', 'POST'])
def spots():
    if request.method == 'POST':
        return "dedede"
    else:
        return check_available_spots()

def check_available_spots():
    return "no spots for you!"
And after running it using export FLASK_APP=valet_parking_slack_bot.server
and flask run, we got this!


Containerizing the server

Now that we have a working server, we should containerize it so that we can deploy it to Cloud Run and execute it from there. Here’s the Dockerfile, with some inline documentation explaining each part:
# Base image. This version is in the pyproject file as well.
FROM python:3.9

# Install various system dependencies.
RUN pip install "poetry==1.1.8"

# Install various project dependencies.
# Copy only requirements to cache them in docker layer.
WORKDIR /app
COPY poetry.lock pyproject.toml /app/
# Install Python dependencies.
RUN poetry config virtualenvs.create false \
  && poetry install --no-interaction --no-ansi

# Run the server.
COPY src/ /app/
EXPOSE 5000
ENV FLASK_APP="valet_parking_slack_bot.server.py"

CMD [ \
	"flask", "run", \
	"--host=0.0.0.0" \
    ]
Deploying the app to the cloud
The moment we’ve all been waiting for! This was really easy, all things considered. GCP has some problems, but the Dev experience is not one of them!
First, we needed to install the gcloud CLI tool, and initialize it using:
gcloud init
After that, deploying to Cloud Run is very simple. Literally just:
gcloud run deploy --port 5000
The port is specified because Cloud Run defaults to apps listening on 8080, and since we have port 5000 defined in the server app and the dockerfile, the default Cloud Run value needs to be overridden.
Then, interactively, we chose the:
- Source code location: The default was correct
Source code location
(/home/shay/Desktop/code/valet-parking-slack-bot):
Next time, use "gcloud run deploy --source ." to deploy the current directory.
- Region: we chose
europe-north-1in Finland since it’s more eco-friendly.

And finally:
✓ Building and deploying... Done.
We then faced a permissions issue: the service responded with an error indicating
we were not permitted to invoke it when trying to test it with a curl command.
Apperantly, the default on GCP is to not have global permissions to invoke the
Cloud Run app. Which is probably correct! So, we added the Cloud Run Invoker
role to the special group allUsers.

After fixing that, WE SUCESSFULLY DEPLOYED A SERVER TO THE CLOUD!!! How cool is that?


We then added a test endpoint to check if the server is working as expected, and wrote a short unit test to validate it. You can check out the details in this PR, but here’s a screenshot that sums it up:

Connecting the server to Slack
We now wanted to create a Slack App, and connect it to the server. We started
by creating a test workspace called NiceFam, and then we used
the Slack API “Your Apps” page to create a new app.
We added it to our test workspace, and configured the /spots test command to
request our cloud server endpoint:

The result?


Woohoo!

What’s next?
This concludes the first part of this particular adventure. In the next post(s), we’ll develop the bot’s interface and integration with Google Calendar. Hopefully, the real deployment will be ready soon!